At ICARVISIONS, we are committed to delivering products that meet stringent quality standards. To ensure this, we implement the GB/T 2828.1-2012 standard for sampling inspection by attributes, a proven method aligned with international practices (equivalent to ISO 2859-1).
Background Information of GB/T 2828.1-2012
GB/T 2828.1-2012, which is the Chinese national standard equivalent to ISO 2859-1:1999. It outlines the sampling procedures for inspection by attributes, mainly used for acceptance quality limit (AQL)-based sampling plans.
Here are the key points of GB/T 2828.1-2012:
Purpose
It's designed for lot-by-lot inspection in a wide range of industries. The focus is on attribute data (pass/fail, defective/non-defective).
Inspection Levels
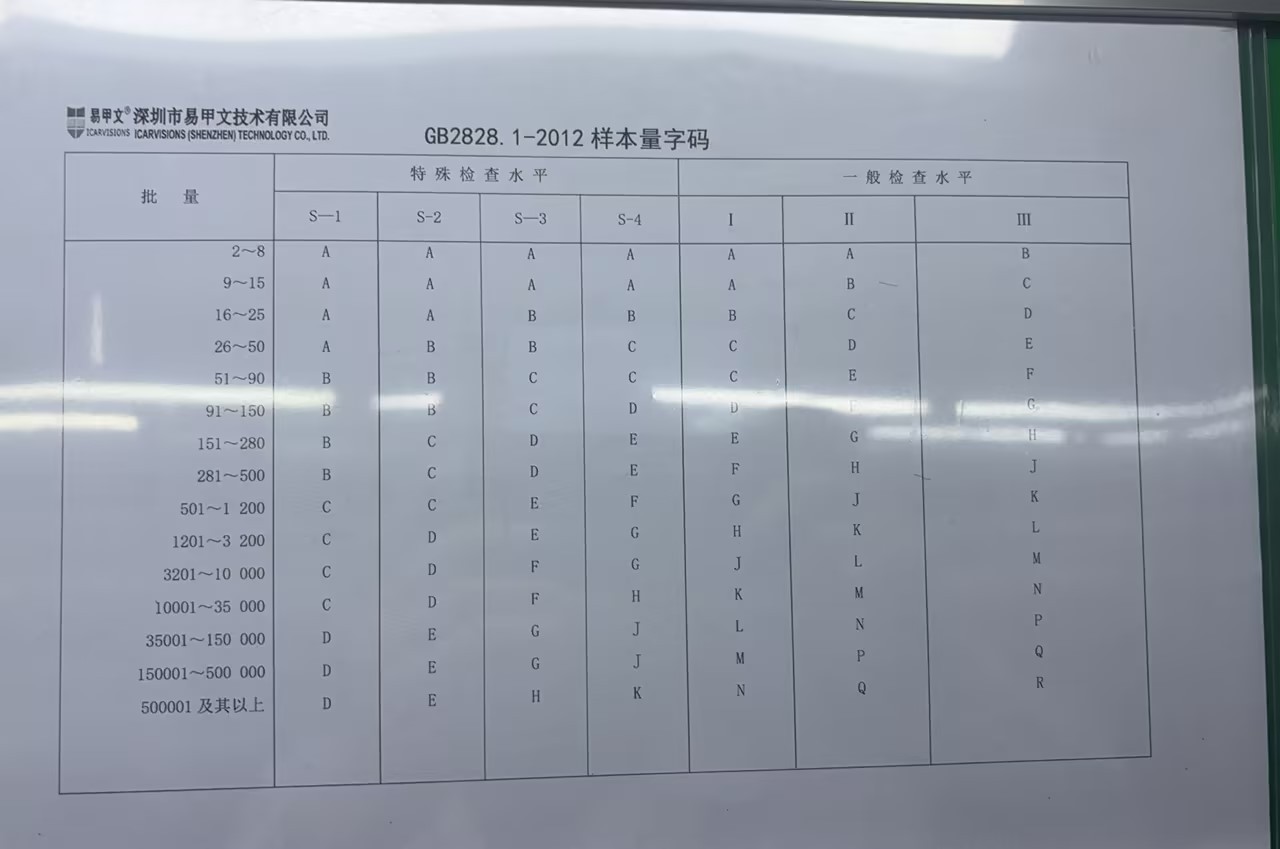
There are three general inspection levels:
I (reduced inspection)
II (normal inspection) → most commonly used
III (tightened inspection)
And four special inspection levels (S-1 to S-4) used for smaller sample sizes.

GB/T 2828.1-2012-ICARVISIONS
AQL (Acceptance Quality Limit)
AQL is the maximum percentage of defective items that can be considered acceptable as a process average. You choose the AQL value (e.g., 1.0%, 2.5%, etc.) based on the acceptable risk for your application.

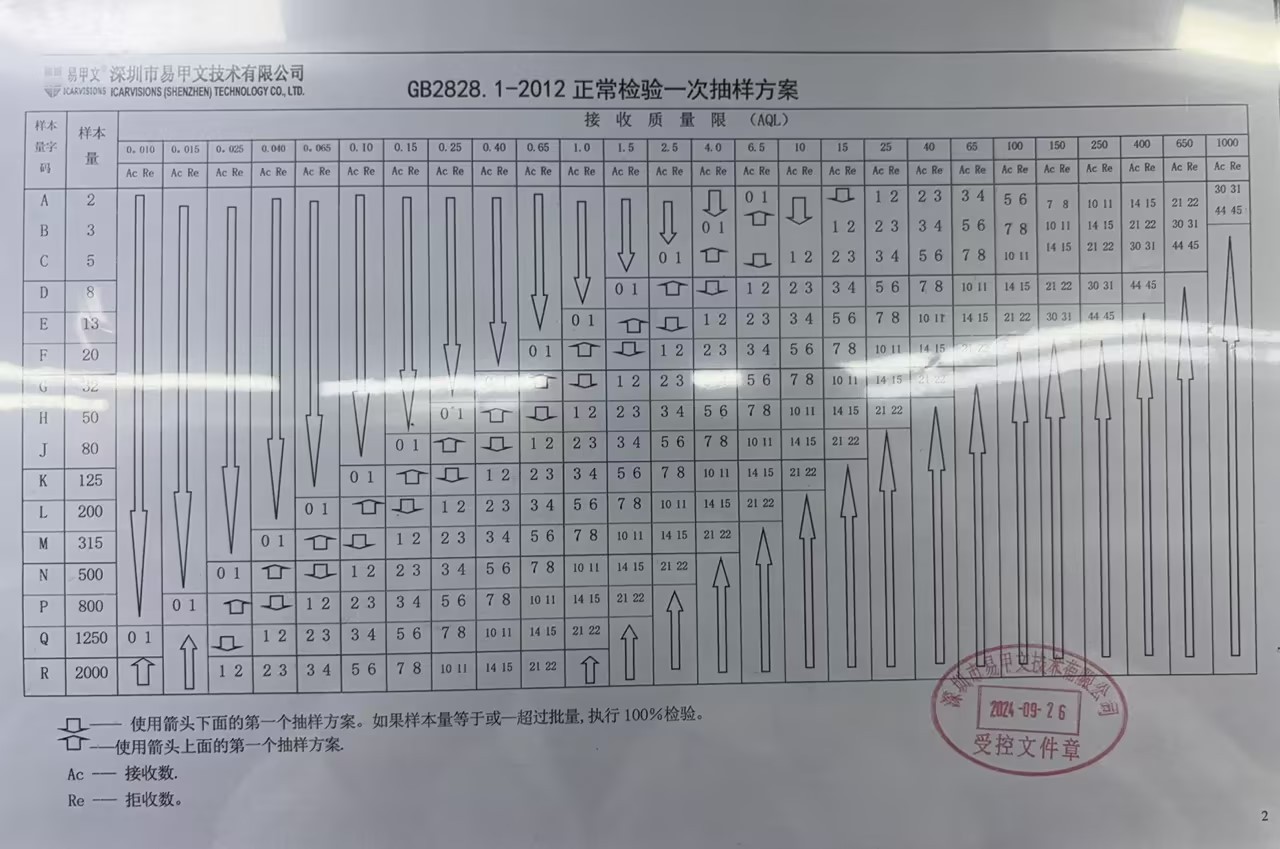
AQL-ICARVISIONS
Sampling Plan
You use the sample size code letter (based on lot size and inspection level) to find:
Sample size
Acceptance (Ac) and Rejection (Re) numbers
This is done using standard tables provided in the standard (like Table 1 and Table 2-A/2-B/2-C).
Why We Use Sampling Inspection
In high-volume production, inspecting every unit is not always practical. Instead, we apply a sampling-based quality inspection process that enables us to assess product quality effectively and efficiently. This method ensures confidence in our output without compromising production flow.
Inspection Level: General Level II
We adopt General Inspection Level II, which is the standard level used for most product inspections. This level provides a balanced sample size that is large enough to detect quality issues reliably, while remaining efficient for ongoing production.
AQL 0.65% – Our Standard for Acceptable Quality
We set our Acceptance Quality Limit (AQL) at 0.65%. This means that during inspection, we accept a batch only if the number of defective units is within the acceptable threshold defined by this AQL level. AQL 0.65% reflects our commitment to strict quality requirements, especially for components and products where reliability is critical.
For example:
If a production batch contains 1,200 units, under Level II with AQL 0.65%, the sample size would be 80 units.
According to the standard’s sampling plan, the acceptance number (Ac) might be 2, and the rejection number (Re) would be 3.
This means: if 2 or fewer defective items are found, the batch passes inspection. If 3 or more are found, the batch is rejected and reviewed.
How the Process Works
Determine the batch size for inspection
Select the sample size code letter using Level II tables
Inspect the required number of units from the batch
Make a pass/fail decision based on the AQL 0.65% acceptance/rejection criteria
Customer Benefits
Tighter quality control through stricter AQL limits
Consistent performance and reliability of delivered products
Fewer defects in the field, reducing after-sales service and improving customer satisfaction
Transparency and traceability in our inspection procedures
By applying GB/T 2828.1-2012 Level II with AQL 0.65%, we demonstrate our dedication to delivering high-quality, dependable products. This quality control approach ensures that our customers receive goods that meet their expectations — every time.

 Icarvisions.com
 Español
 português
 简体中文
简体中文 繁體中文
繁體中文 Deutsch
 Français
 日本語
日本語 한국어
한국어 بالعربية
 TÜRKÇE
 русский
 English
Contact Us
Questions or comments? Please fill out the form below, send a quick message, or call us. We love to hear from you!